Thermomix Cookies & Cream Ice Cream
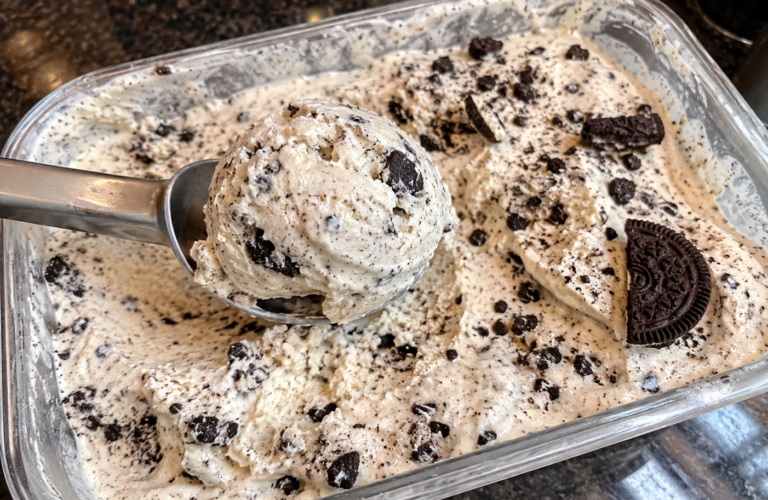
This Thermomix Cookies & Cream Ice Cream is rich, creamy, smooth, and packed with crunchy chocolate cookie pieces. It is an easy homemade dessert that brings together a creamy vanilla ice cream base with plenty of crushed cookies in every scoop.
Using the Thermomix makes the preparation simple because the ingredients can be mixed and heated in the bowl before the mixture is chilled and frozen. The result is a delicious homemade ice cream that is perfect for family desserts, birthdays, summer gatherings, or whenever you’re craving something sweet and creamy.
Ingredients
Ice Cream Base
- 500 g full-fat milk
- 300 g thickened cream
- 120 g caster sugar
- 4 egg yolks
- 1 teaspoon vanilla extract
- 1 tablespoon cornflour
- Pinch of salt
Cookies
- 150–180 g chocolate sandwich cookies
- 50 g extra cookies for topping, optional
You can use your favorite chocolate sandwich-style cookies. If you have a preferred brand, choose the cookies you enjoy most.
Why You’ll Love This Recipe
This homemade Cookies & Cream Ice Cream is:
- Easy to make in the Thermomix
- Rich and creamy
- Full of chocolate cookie pieces
- Great for kids and adults
- Perfect for entertaining
- Easy to prepare ahead
- Customizable
- Delicious served in cones, bowls, or alongside cake
The combination of smooth vanilla ice cream and crunchy chocolate cookies makes this a classic flavor that never goes out of style.
Step 1: Prepare the Cookies
Place approximately 150–180 g of chocolate sandwich cookies into the Thermomix mixing bowl.
Crush them briefly using:
3 seconds / speed 4
Check the texture.
You want a mixture containing both small crumbs and some slightly larger pieces.
Avoid crushing the cookies into a completely fine powder because larger pieces give the finished ice cream its characteristic Cookies & Cream texture.
Transfer the crushed cookies to a separate bowl and set aside.
Clean and dry the Thermomix bowl before preparing the ice cream base.
Step 2: Prepare the Ice Cream Base
Add the milk, cream, caster sugar, egg yolks, cornflour, vanilla extract, and salt to the Thermomix mixing bowl.
Mix for:
10 seconds / speed 4
This combines everything evenly before heating.
Step 3: Cook the Custard
Cook the mixture for:
8 minutes / 80°C / speed 3
The mixture should become slightly thicker and creamy.
The goal is to create a smooth custard base without overheating it.
Once finished, check the consistency.
It should coat the back of a spoon lightly. It will become considerably thicker after chilling and freezing.
Step 4: Cool the Mixture
Transfer the custard to a clean heatproof container.
Allow it to cool at room temperature for a short period.
Then cover and refrigerate until completely chilled.
This usually takes approximately 3–4 hours, although chilling it overnight works especially well.
A completely cold base gives the ice cream a better texture when frozen.
Step 5: Add the Cookie Pieces
Once the ice cream base is thoroughly chilled, pour it into a shallow freezer-safe container.
Add approximately two-thirds of the crushed cookies.
Stir gently with a spatula until the cookies are distributed throughout the mixture.
Reserve the remaining cookies for later.
Step 6: Freeze
Place the container in the freezer.
Freeze for approximately 4–6 hours, or until firm.
For the smoothest result, freezing the mixture in a relatively shallow container is helpful because it freezes more evenly.
If you are making the ice cream ahead of time, it can remain in the freezer overnight.
Step 7: Process for a Creamier Texture
Once the mixture is frozen solid, cut it into chunks approximately 3–4 cm in size.
Place the frozen pieces into the Thermomix mixing bowl.
Process for:
20 seconds / speed 6
Scrape down the sides.
Then mix for:
10 seconds / speed 4
The ice cream should become smooth, creamy, and scoopable.
Don’t over-process it.
The goal is to soften the frozen mixture while maintaining a thick ice cream consistency.
Step 8: Add More Cookies
Add the reserved crushed cookies.
Mix gently using:
10 seconds / reverse / speed 2
This distributes the remaining cookie pieces without pulverizing them.
For extra texture, you can fold a few additional larger cookie pieces through the ice cream by hand.
Step 9: Final Freeze
Transfer the finished ice cream back into a freezer-safe container.
Smooth the surface with a spatula.
Sprinkle the remaining cookie pieces over the top.
Cover tightly and freeze for another 1–2 hours.
This allows the ice cream to firm up while remaining creamy and easy to scoop.
Serving Suggestions
Remove the ice cream from the freezer approximately 5–10 minutes before serving.
This allows it to soften slightly and makes scooping much easier.
Serve it in:
- Ice cream cones
- Dessert bowls
- Waffle cones
- Cookie cups
- Sundae glasses
For an extra-special dessert, add whipped cream, chocolate sauce, crushed cookies, or a few whole chocolate sandwich cookies on top.
Tips for the Best Thermomix Cookies & Cream Ice Cream
Use Full-Fat Dairy
Full-fat milk and cream provide the richest texture.
Lower-fat ingredients can result in a harder, icier consistency.
Chill the Custard Completely
Don’t rush the chilling stage.
The colder the custard is before freezing, the better the final texture will be.
Don’t Over-Crush the Cookies
A combination of crumbs and larger pieces gives the ice cream the best texture.
Use Good-Quality Vanilla
Vanilla is an important part of the base, so a good-quality vanilla extract will make a noticeable difference.
Store It Properly
Keep the ice cream in an airtight freezer-safe container to reduce ice crystals and freezer odors.
Variations
Extra Chocolate Cookies
For serious cookie lovers, increase the amount of cookies to around 200 g.
Chocolate Ice Cream Base
Add 2 tablespoons of cocoa powder to the custard base for a chocolate Cookies & Cream version.
White Chocolate Cookies & Cream
Fold small pieces of white chocolate through the finished ice cream along with the cookies.
Mint Cookies & Cream
Add a small amount of peppermint extract to the base for a refreshing mint variation.
Chocolate Chip Version
Add mini chocolate chips together with the crushed cookies.
Frequently Asked Questions
Can I make this without eggs?
Yes. The egg yolks help create a rich custard texture, but an egg-free version can be made by using additional cornflour to help thicken the base. The texture will be slightly different.
Can I use different cookies?
Absolutely. Chocolate sandwich cookies, chocolate biscuits, filled cookies, or homemade chocolate cookies can all work.
How long does the ice cream last?
For the best texture and flavor, enjoy it within approximately 2–3 weeks when stored properly in a sealed freezer-safe container.
Why is my ice cream too hard?
Homemade ice cream can become quite firm after several hours in the freezer because it doesn’t contain the same commercial stabilizers found in store-bought ice cream.
Allow it to sit at room temperature for a few minutes before scooping.
Can I make it ahead?
Yes. This is an excellent make-ahead dessert.
Prepare it the day before serving and allow it to firm up overnight.
Can I add the cookies before freezing?
Yes, but adding some cookies after processing gives you a better distribution of crunchy pieces throughout the finished ice cream.
Storage
Store the ice cream in an airtight freezer-safe container.
Press a piece of baking paper or parchment directly against the surface before sealing if you want to reduce the formation of ice crystals.
Always use a clean scoop when serving.
Recipe Summary
Prep Time: 15 minutes
Chilling Time: 3–4 hours
Freezing Time: 5–8 hours
Total Time: Approximately 8 hours
Servings: 8–10
Difficulty: Easy
Method: Thermomix + Freezer
Final Thoughts
This Thermomix Cookies & Cream Ice Cream is a fantastic homemade dessert for anyone who loves the classic combination of creamy vanilla ice cream and chocolate cookies.
The Thermomix makes preparing the custard base straightforward, while the extra processing after freezing helps create a smooth and creamy texture.
The best part is the cookies. Some are crushed finely into the ice cream, while larger pieces provide delicious chocolatey crunch throughout every scoop.
Whether you’re serving it at a family gathering, making a weekend dessert, or simply treating yourself, this homemade Cookies & Cream Ice Cream is an easy recipe worth keeping in your Thermomix collection.