
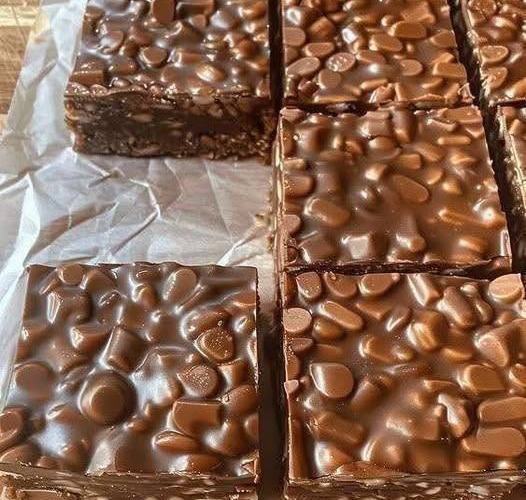
No-Bake Chocolate Peanut Butter Crunch Bars – Thermomix Recipe
These No-Bake Chocolate Peanut Butter Crunch Bars are rich, creamy, crunchy, and incredibly easy to prepare. They combine smooth peanut butter, crispy cereal, chocolate, and a touch of sweetness to create a delicious homemade treat without turning on the oven.
This recipe is especially convenient for busy days because the Thermomix does most of the mixing and melting work. Once the mixture is pressed into a lined pan and chilled, the bars are ready to slice and enjoy.
They are perfect for dessert tables, afternoon snacks, lunchbox treats, parties, or a quick sweet craving. The combination of chocolate and peanut butter gives these bars a classic flavor that is hard to resist, while the crunchy texture makes every bite satisfying.
Ingredients
For the Crunchy Base
- 2 cups (60 g) crispy rice cereal
- 1 cup (90 g) rolled oats
- ¾ cup (190 g) smooth peanut butter
- ⅓ cup (110 g) honey or maple syrup
- 2 tablespoons coconut oil
- 1 teaspoon vanilla extract
- ¼ teaspoon salt
For the Chocolate Topping
- 1 ½ cups (260 g) chocolate chips or chopped chocolate
- 1 tablespoon coconut oil
- 2 tablespoons smooth peanut butter
Optional Toppings
- Chopped peanuts
- Crushed crispy cereal
- A light drizzle of melted peanut butter
- Flaky sea salt
- Mini chocolate chips
For a gluten-free version: use certified gluten-free oats and certified gluten-free crispy cereal.
Why You’ll Love These Bars
There are plenty of reasons to keep this recipe in your collection.
These bars are:
- No-bake
- Thermomix-friendly
- Quick to prepare
- Rich and chocolatey
- Full of peanut butter flavor
- Crunchy and creamy
- Easy to slice
- Great for sharing
- Convenient for make-ahead desserts
The texture is one of the best parts. The bottom layer is soft and chewy with plenty of crunch, while the chocolate topping becomes firm but still melts slightly in your mouth.
Preparing the Pan
Before making the mixture, prepare an approximately 20 x 20 cm (8 x 8 inch) square baking pan.
Line the pan with parchment paper, leaving some paper hanging over two sides.
This makes it much easier to remove the chilled bars later.
Lightly grease the parchment paper if desired.
Step 1: Prepare the Crunchy Ingredients
Place the crispy rice cereal and rolled oats into a large bowl.
Set them aside.
Keeping these ingredients separate initially prevents them from becoming too soft while the peanut butter mixture is being heated.
If you want an especially crunchy texture, you can use a slightly larger amount of crispy cereal.
Step 2: Melt the Peanut Butter Mixture in the Thermomix
Place the peanut butter, honey or maple syrup, and coconut oil into the Thermomix mixing bowl.
Heat for approximately:
4 minutes / 60°C / Speed 2
The mixture should become smooth and easily pourable.
If necessary, scrape down the sides of the bowl and heat for another 30 seconds.
Do not overheat the mixture.
The goal is simply to soften and combine the ingredients.
Step 3: Add Vanilla and Salt
Add the vanilla extract and salt to the warm peanut butter mixture.
Mix for:
10 seconds / Speed 3
This distributes the flavor evenly throughout the mixture.
The salt helps balance the sweetness and enhances the chocolate and peanut butter flavors.
Step 4: Combine With the Crunchy Ingredients
Pour the warm peanut butter mixture over the crispy cereal and oats.
Use a spatula to gently fold everything together.
Make sure the cereal and oats are evenly coated.
Work gently so you don’t crush all of the crispy cereal.
The mixture should become sticky and hold together when pressed.
Step 5: Press Into the Pan
Transfer the mixture to the prepared baking pan.
Spread it evenly.
Use the back of a spoon, spatula, or the bottom of a glass to press the mixture firmly into the pan.
This step is important.
Pressing firmly helps the bars hold together when sliced.
Pay particular attention to the corners and edges.
Step 6: Chill the Base
Place the pan in the refrigerator.
Chill for approximately 30–45 minutes, or until the base feels firm.
While the base is chilling, prepare the chocolate topping.
Step 7: Melt the Chocolate in the Thermomix
Clean and dry the Thermomix mixing bowl.
Add the chocolate chips or chopped chocolate.
Melt using:
3 minutes / 50°C / Speed 2
Scrape down the sides if necessary.
Continue heating in short intervals if small pieces of chocolate remain.
Avoid overheating the chocolate because excessive heat can make it thick or grainy.
Step 8: Add Coconut Oil and Peanut Butter
Add the coconut oil and 2 tablespoons of peanut butter to the melted chocolate.
Mix for:
20 seconds / Speed 3
The mixture should become smooth, glossy, and easy to spread.
The peanut butter adds extra flavor while the coconut oil helps create a smooth chocolate topping.
Step 9: Add the Chocolate Layer
Remove the chilled base from the refrigerator.
Pour the melted chocolate mixture over the top.
Use a spatula to spread it evenly from edge to edge.
For a decorative finish, drizzle a small amount of melted peanut butter over the chocolate.
Use a toothpick or knife to create simple swirls.
Step 10: Add Optional Toppings
Before the chocolate sets, sprinkle your chosen toppings over the surface.
You could use:
- Chopped peanuts
- Crushed cereal
- Mini chocolate chips
- Flaky sea salt
Keep the toppings light so the bars remain easy to cut.
Step 11: Chill Until Firm
Return the pan to the refrigerator.
Chill for at least 2 hours.
For the cleanest slices, you can leave the bars in the refrigerator overnight.
The chocolate topping should become firm and the base should hold together securely.
Step 12: Slice the Bars
Remove the chilled slab from the pan using the parchment paper.
Place it on a cutting board.
Use a sharp knife to cut it into bars or squares.
For cleaner cuts, allow the knife to sit in warm water for a few seconds, dry it thoroughly, and then slice.
Repeat as needed.
You can make small bite-sized squares for parties or larger bars for snacks.
Tips for Perfect Bars
Press the Base Firmly
If the mixture isn’t packed firmly enough into the pan, the bars may crumble when sliced.
Don’t Overheat the Chocolate
Gentle heating produces a smoother topping.
Use Smooth Peanut Butter
Smooth peanut butter makes the mixture easier to combine and gives the bars a creamy texture.
Keep the Bars Chilled
Because the recipe contains coconut oil and chocolate, the bars become softer at warmer room temperatures.
Store them chilled for the firmest texture.
Variations
Dark Chocolate Peanut Butter Bars
Use dark chocolate instead of milk chocolate for a richer, less sweet flavor.
Milk Chocolate Version
Milk chocolate creates a sweeter and creamier topping.
Crunchy Peanut Butter Version
Replace some of the smooth peanut butter with crunchy peanut butter for extra texture.
Chocolate Drizzle
Instead of covering the entire top, drizzle melted chocolate over the bars for a lighter finish.
Extra Nut Crunch
Add chopped roasted peanuts to the base mixture.
Coconut Version
Add a small amount of unsweetened shredded coconut to the base for extra texture.
How to Serve
These bars are delicious straight from the refrigerator.
Serve them with:
- Coffee
- Tea
- Cold milk
- Fresh berries
- Greek yogurt
- A small scoop of ice cream
For parties, cut them into small squares and arrange them on a serving platter.
Their chocolate topping and crunchy base make them look like a homemade confection even though they require very little preparation.
Storage
Store the finished bars in an airtight container in the refrigerator.
They will generally keep well for approximately 5–7 days when properly covered.
Place parchment paper between layers if stacking them.
This prevents the chocolate topping from sticking to other bars.
Freezing Instructions
These bars can also be frozen.
Place individual bars in a freezer-safe container with parchment paper between layers.
Freeze for up to 2 months.
When ready to eat, transfer the desired number of bars to the refrigerator and allow them to thaw gradually.
They can also be enjoyed slightly chilled for a firmer texture.
Frequently Asked Questions
Do I have to use a Thermomix?
No. The recipe can also be prepared using a saucepan and microwave-safe bowl, but the Thermomix makes the melting and mixing process convenient.
Can I use almond butter?
Yes. Almond butter can replace peanut butter, although the flavor will be different.
Can I make these gluten-free?
Yes. Use certified gluten-free oats and certified gluten-free crispy cereal, and check all packaged ingredients for gluten-free labeling.
Why are my bars falling apart?
The base may not have been pressed firmly enough, or the mixture may not have enough binding ingredients. Press the mixture firmly into the pan and chill it thoroughly before slicing.
Why is my chocolate topping too soft?
Allow the bars to chill for longer. Coconut oil can make chocolate softer at warmer temperatures, so refrigerator storage is recommended.
Can I make them without oats?
Yes. You can replace the oats with additional crispy cereal or another suitable crunchy ingredient, although the texture will change.
Final Thoughts
These No-Bake Chocolate Peanut Butter Crunch Bars are an easy and delicious Thermomix-friendly treat that combines everything people love about chocolate and peanut butter.
The crunchy cereal gives the base a satisfying texture, while the peanut butter creates a rich and creamy flavor. The smooth chocolate topping finishes everything beautifully.
Because there is no oven required, these bars are particularly convenient during busy days or when you want a homemade dessert without spending a lot of time in the kitchen.
Prepare the base, chill it, add the chocolate topping, and let everything firm up in the refrigerator. Once sliced, you’ll have simple homemade bars that are perfect for sharing or keeping in the fridge for a quick sweet treat.
For the best results, press the base firmly, melt the chocolate gently, and give the bars enough time to chill before cutting. A little extra chopped peanut or flaky sea salt on top can make them even more delicious.