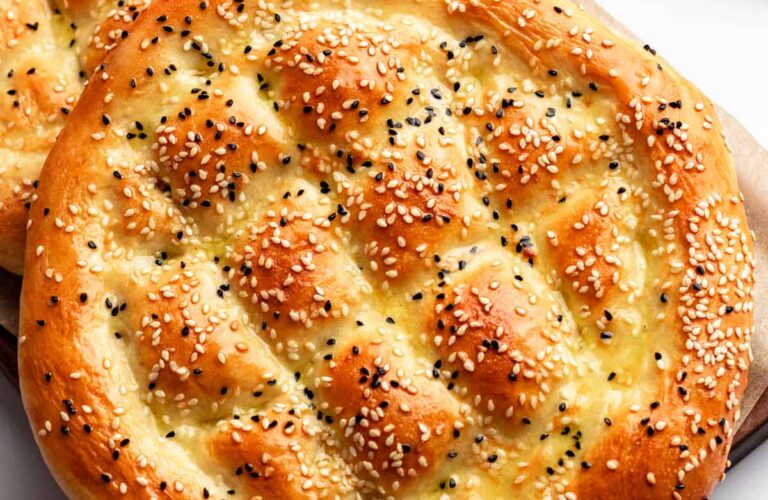
Sourdough Turkish bread combines the rich, slightly tangy character of natural fermentation with the soft, chewy texture of traditional Turkish bakery bread. Turkish bread comes in many forms, but this recipe is inspired by the oval, patterned loaves commonly found in Turkish bakeries and village kitchens. Using a sourdough starter instead of commercial yeast creates deeper flavor, better texture, and a crust that becomes beautifully golden during baking.
This recipe makes one large loaf or two medium loaves.
Ingredients
For the dough:
- 500 g bread flour
- 350 g lukewarm water
- 100 g active sourdough starter (fed and bubbly)
- 10 g salt
- 15 g olive oil
For topping:
- 1 egg yolk
- 1 tablespoon milk
- 1 tablespoon olive oil
- Sesame seeds as needed
- Nigella seeds as needed
Optional:
- A small amount of flour for dusting
- Extra olive oil for brushing
Equipment Needed
- Large mixing bowl
- Dough scraper
- Baking tray or baking stone
- Parchment paper
- Kitchen towel or plastic wrap
- Small bowl for egg wash
Before Starting
Your sourdough starter should be active before mixing the dough. Feed your starter approximately 4–8 hours before baking, depending on room temperature. A ready starter usually doubles in size and appears bubbly and airy.
A healthy starter is important because sourdough relies completely on naturally occurring yeast and bacteria. An inactive starter can produce dense bread.
Step 1: Mix the Dough
Pour the flour and water into a large bowl. Mix until no dry flour remains. The dough will look rough and slightly sticky.
Cover the bowl and allow it to rest for 30 minutes. This process is called autolyse. During autolyse, the flour absorbs moisture and gluten begins forming naturally. This improves dough strength and makes kneading easier later.
After 30 minutes, add the active sourdough starter, salt, and olive oil.
Mix thoroughly by hand or with a spoon until all ingredients are incorporated. The dough may initially feel sticky, but it will become smoother as fermentation develops.
Step 2: Bulk Fermentation
Cover the bowl and leave the dough at room temperature for approximately 4–6 hours.
During the first two hours, strengthen the dough using stretch-and-fold techniques every 30 minutes.
To perform a stretch and fold:
- Wet your hands slightly.
- Lift one side of the dough.
- Stretch it upward gently.
- Fold it over itself.
- Turn the bowl and repeat on all four sides.
Complete this process about three or four times during the first part of fermentation.
As the dough ferments, it should become smoother, stronger, and noticeably puffier.
The exact fermentation time depends on temperature:
- Warm kitchens may take around 4 hours.
- Cooler kitchens may require 6 hours or longer.
Look at the dough rather than the clock. It should appear airy and increase noticeably in volume.
Step 3: Shape the Turkish Bread
Lightly flour your work surface.
Transfer the dough onto the counter and gently shape it into an oval or large round form.
Traditional Turkish bread often has a wide oval shape rather than a tall loaf shape.
Avoid pressing out all the air because those fermentation bubbles create a lighter texture.
Place the shaped dough onto parchment paper on a baking tray.
Cover loosely and allow it to rest for another 1–2 hours for final proofing.
The dough should become puffy and soft.
Step 4: Prepare the Topping
In a small bowl combine:
- Egg yolk
- Milk
- Olive oil
Mix well.
This topping gives the bread its characteristic shiny golden crust.
Brush the surface lightly.
Now create the classic Turkish pattern.
Using your fingertips or the edge of your hand, gently press lines into the dough. Make diagonal lines in one direction, then cross them in the opposite direction to create a diamond pattern.
Do not press deeply enough to flatten the loaf.
Sprinkle sesame seeds and nigella seeds over the surface.
Nigella seeds add an earthy flavor that is very common in Turkish baking.
Step 5: Bake the Bread
Preheat the oven to 230°C (445°F) for at least 30 minutes.
If using a baking stone, place it inside during preheating.
To create steam:
- Place a metal tray on the lower oven rack.
- Pour hot water into it immediately after placing the bread in the oven.
Steam helps the crust expand and prevents it from hardening too early.
Bake for:
- First 10 minutes with steam
- Additional 15–20 minutes without adding more water
Total baking time is usually 25–30 minutes.
The bread should become deep golden brown with a crisp crust.
If you tap the bottom, it should sound hollow.
Step 6: Cooling
Remove the bread from the oven and place it on a cooling rack.
Allow it to cool for at least 30–45 minutes before slicing.
Fresh bread continues cooking internally after leaving the oven. Cutting too early may make the crumb slightly gummy.
Serving Suggestions
Sourdough Turkish bread works beautifully with:
- Olive oil and za’atar
- Feta cheese
- Honey and butter
- Turkish breakfast spreads
- Lentil soup
- Grilled meat dishes
- Kebabs
- Eggs and vegetables
The bread also makes excellent sandwiches because the crust is chewy while the inside remains soft.
Storage Tips
Store at room temperature in a cloth bag or bread box for 2–3 days.
Avoid refrigeration because it can dry bread quickly.
For longer storage:
- Slice completely
- Freeze in a sealed bag
- Reheat directly in the oven or toaster
The flavor often becomes even better the next day because sourdough fermentation continues developing subtle complexity.
With patience and proper fermentation, this sourdough Turkish bread delivers a bakery-style loaf with a chewy interior, aromatic crust, and traditional Turkish appearance.